

Over the last 2 weeks, my son and I have tested, filmed, and approved a ton of easy science activities for preschoolers.
As a teacher and a parent of a preschooler, I know that doing fun activities with your child can take time and money.
Thinking of parents like you and me, this list only has activities that are quick, easy, and low-cost.
I’ve turned these 21 activities into a free ebook that you can download and use to do at home with your kids! Grab your free eBook with 21 easy preschool science activities.
++Plus! Get a super secret 7-Day Challenge.😮

As an Amazon Associate, I earn from qualifying purchases. Some of the links in this post are affiliate links, which means if you click on the link and make a purchase, I may earn a commission. This commission comes at no additional cost to you and is how I am able to create more amazing content for you. Thank you for your support!
Check out what’s inside this list!
- Magic Paper Towel
- Magic Milk
- Pop Rocks 5 Senses
- Ice Excavation
- Sink the Egg
- Shadow Block Match
- Ice Cream In A Bag
- Color Water Transfer
- Skittles Rainbow Experiment
- Ice Hockey
- Ocean Bottles
- Growing Gummy Bears
- Butter In A Jar
- Nature’s Paint Brushes
- Edible Marshmallow Slime
- Sun Prints
- Floating Drawings
- Make Music With Water
- Flour Sensory Play
- Leaf Rub Coloring
- Slide Painting
- BONUS Activity!
- What’s Next?
Like always, be sure to do these activities with adult supervision.
Read on to start experimenting!
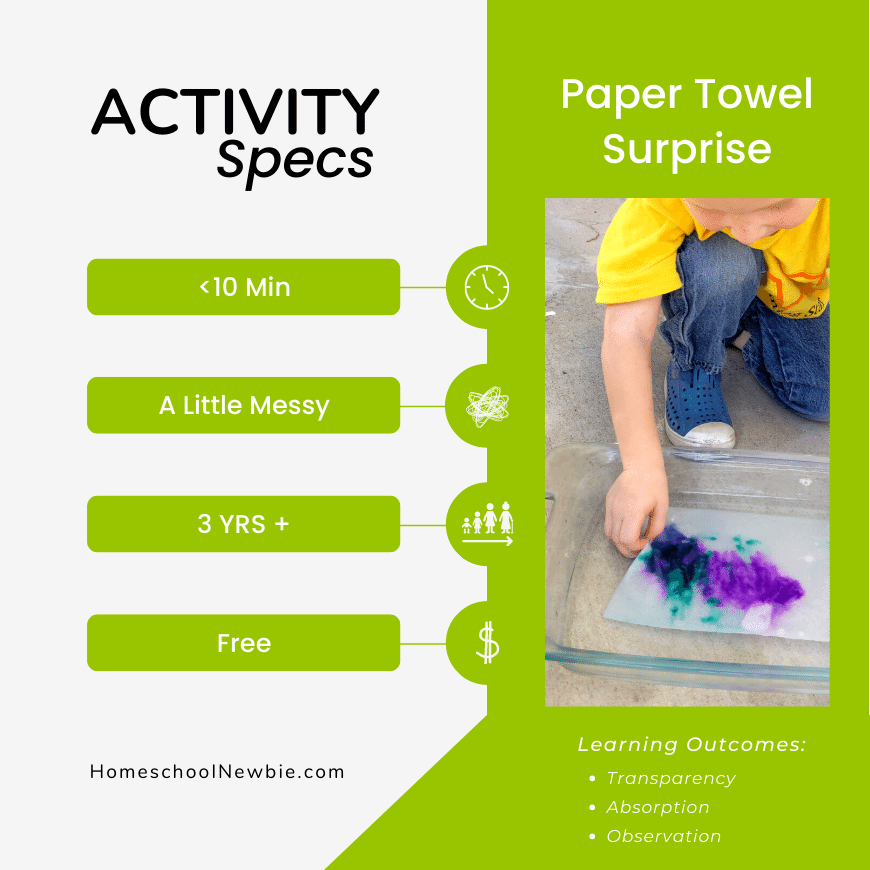
Paper Towel Surprise
Learning Outcomes:
- Transparency
- Absorption
- Observation
Materials:
- Paper towel
- Markers
- Container
- Water
Directions:
- Fold a piece of paper towel in half.
- Draw on top of the paper towel the scene you want to show.
- Open the paper towel and trace the scene using the lines that bleed through.
- Draw the “surprise” image on the inside of the paper towel.
- Fold the paper towel so the inside image is hidden.
- When ready, place the paper towel in water.
- The “surprise” image should be visible!
Expert Tips:
- Use markers that won’t bleed when wet such as permanent or dry erase markers.
- Try these surprise art ideas:
- Dinosaurs popping out of their eggs
- Lava exploding from a volcano
- Fish/sea creatures appearing underwater
- Fireworks appearing in the sky
- Color appears from a black & white image (flower, boat, etc.)
- Toppings appear on a cheese pizza
- Butterfly wings appear on a caterpillar
- Sprinkles appear on an ice cream cone
Learn more about this activity at activelittles.com
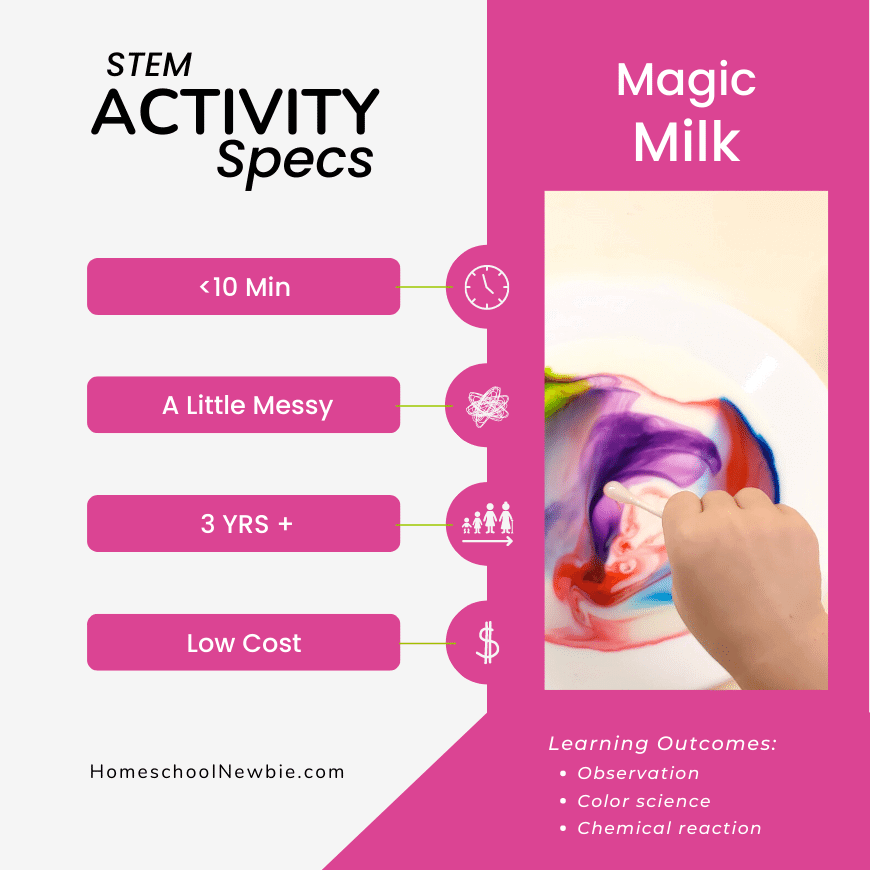
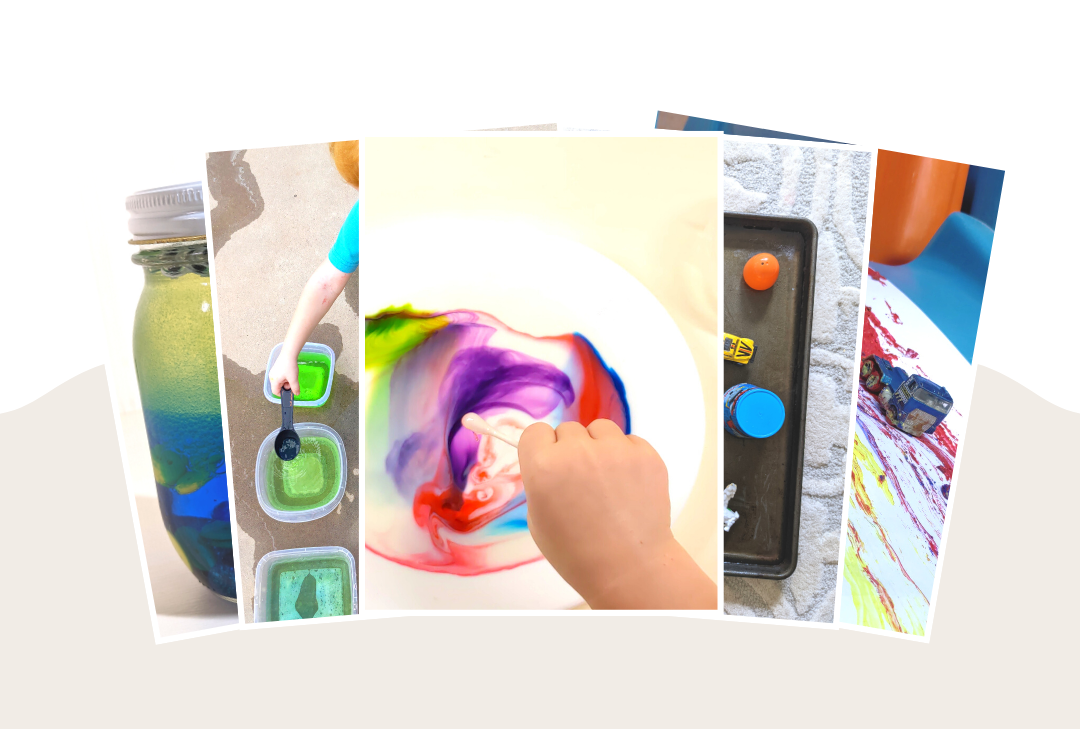
Magic Milk
Learning Outcomes:
- Observation
- Color science
- Chemical reaction
Materials:
- Milk
- Dish soap
- Food coloring
- Plate
- Q-tip
Directions:
- Pour milk on the plate until it covers the bottom.
- Add 3-5 drops of food coloring to the milk. (Do NOT Mix!)
- Dip the q-tip into the dish soap.
- Press the q-tip into the center of the milk and hold it there.
- Watch the colors swirl!
Expert Tips:
- Add primary color combinations to teach color mixing science.
- Using multi colors gives a contrasting effect
- Experiment with other materials. Can you add sparkles or other liquids?
Learn more about this activity at laughingkidslearn.com

Pop Rocks 5 Senses
Learning Outcomes:
- 5 Senses
- Observation
Materials:
- Pop Rocks
- Drawing or 5 senses printable(optional)
- Mini cups or containers
Directions:
- Print and cut out pictures to represent the 5 senses and arrange them in a row.
- Set out 5 mini cups behind each picture and put a small amount of pop rocks in each cup (we used one packet for all 5 cups)
- Explain that our bodies use senses to experience things around us. Give a few examples such as “I can touch the chair and it feels smooth”.
- Explain that they will be using their senses to learn about the pop rocks.
- Tell them to use their eyes to see the Pop Rocks in the first cup.
- Touch the Pop Rocks in the second cup, smell the third cup, taste the fourth cup, and listen to the fifth cup.
- Ask your child questions as they experience each sense.
- “What does it look like, feel like, smell like, taste like, sound like?”
Expert Tips:
- Pour water into the last cup to better hear the popping sound.
Learn more about this activity at modernhomesteadmama.com

Ice Excavation
Learning Outcomes:
- States of Matter
- History: Dinosaurs, ice age
Materials:
- Container
- Toys/small items
- Water
- Freezer
- Hammer or stone
- Goggles (optional)
Directions:
- Fill a container with water.
- Place small toys/objects into the water.
- Freeze container.
- Use a hammer or stone to excavate the toys!
Expert Tips:
- Set the frozen container out to melt for about 5 minutes before trying to get the ice out.
- Poor water over the ice using a squirt/squeeze bottle to speed up the melting process.
- Learn other lessons by excavating other items like colors, shapes, or letters.
- Try excavating dinosaur eggs!
Learn more about this activity at lifeatthezoo.com

Sink the Egg
Learning Outcomes:
- Float or sink
- Predicting
- Observing
- Comparing & estimating
Materials:
- Bucket/container
- Plastic eggs
- Various small household objects…
- Coins
- Pom poms
- Paper clips
- Erasers
- Beads
- Screws
- Nuts & bolts
- etc.
Directions:
- Have your child make predictions about which objects will make the egg sink.
- Fill the eggs with various items.
- Place the eggs in a bucket of water.
- Observe the eggs to see if your child’s predictions were correct.
Expert Tips:
- Use caution with small or sharp objects.
Learn more about this activity at happytoddlerplaytime.com

Shadow Tower Match
Learning Outcomes:
- Engineering
- Patterns
- Counting
- Replication
Materials:
Directions:
Prep:
- Build a tower and cast a shadow using a flashlight.
- Tape the flashlight on a slightly elevated place (chair, nightstand, desk)
- Place the paper on the floor (use tape for extra security)
- Build a tower on the edge of the paper so the shadow is visible on the paper.
- Trace the outline of the tower’s shadow.
- Set the blocks aside.
- Repeat to create more shadow challenges.
Activity:
- Invite your child to build a tower that casts a shadow that matches the outline on the paper. Have your child use the same blocks that were set aside.
Expert Tips:
- Use other objects to cast shadows such as LEGOs, action figures, or other small toys.
Learn more about this activity at handsonaswegrow.com

Ice Cream In A Bag
Learning Outcomes:
- States of matter
- Reversible change (liquid to solid then solid to liquid)
Materials:
- 1 cup half and half
- 1 tsp vanilla
- 2 T sugar
- 3-6 Cups of ice
- ¼ Cup salt
- Toppings (optional)
- 1 Gallon size Ziploc bag
- 2 Quart size Ziploc bags
Directions:
- Mix together 1 cup of half and half, 1 tsp vanilla, and 2T of sugar.
- Add the mixture to a small bag and seal the bag.
- Add 3-6 cups of ice and ¼ cup of salt to a gallon-sized bag.
- Place the smaller bag in the large bag of ice.
- Shake the bags for about 10 minutes.
- Rinse the smaller bag to prevent the salt from contaminating the ice cream.
- Start eating!
Expert Tips:
- Rinse the bag well before eating. Even rinsing the top of the seal prevents the ice cream from tasting salty.
- Use gloves when shaking the bag to protect your hands from the cold.
- Double up the bags to ensure the salt doesn’t leak into the ice cream bag.
Learn more about this activity at thebestideasforkids.com

Color Water Transfer
Learning Outcomes:
- Mixing colors
Materials:
- 6 containers
- Water
- Food coloring: red, blue, & yellow
- Transferring tools: Measuring cups, Spoons, Droppers
Directions:
- Fill 6 containers with water.
- Add blue, yellow, and red food coloring to 3 of the containers.
- Provide your child with various transferring tools.
- Let them explore and mix colors freely!
Expert Tips:
- Do this activity on your lawn. The food coloring may temporarily dye cement.
Learn more about this activity at handsonaswegrow.com

Skittles Rainbow Experiment
Learning Outcomes:
- 5 senses observation
- Experimentation
Materials:
Directions:
- Arrange a Skittle pattern on a white plate.
- Carefully pour water onto the plate of Skittles.
- Within a few seconds, you’ll see the colors spread!
Expert Tips:
- Arrange the Skittles into new patterns and designs.
- Try different variations to this activity.
- “What will happen if we add…hot water, milk, vinegar, or different kinds of candy?”
Learn more about this activity at lifeovercs.com

Ice Hockey
Learning Outcomes:
- Friction
- States of matter (solid, liquid, gas)
Materials:
- Water
- Cookie sheet
- Small household items
- Toys
- Fabric
- Craft supplies
- Stone
- Sticks
- Leaves
- Kitchen utensils
Directions:
- Fill a cookie sheet with water about halfway.
- Freeze overnight.
- Invite your child to slide various objects across the ice.
- Make predictions on which items will slide the best/worst.
Expert Tips:
- Try sliding materials of various textures to see how they compare.
- Play games like race who objects or play air hockey.
- If you are in a pinch for time, we were able to freeze the cookie sheet well enough within a couple of hours. It wasn’t frozen solid but it worked.
Learn more about this activity at creativefamilyfun.net

Ocean Wave Activity Bottles
Learning Outcomes:
- Ocean life
- Waves
- Observation
Materials:
- Sealable container (jar, bottle)
- Vegetable or baby oil
- Water
- Blue food coloring
- Small bowl
- Ocean Decor:
Directions:
- Mix blue food coloring with the water.
- Add the mixture to the container.
- Pour vegetable oil into the container.
- Add decorations inside.
- Play, tilt, and explore!
Expert Tips:
- Make sure the lid is sealed! Try super glue or a hot glue gun to make it extra toddler-proof.
Learn more about this activity at thestayathomeeducator.com

Growing Gummy Bears Experiment
Learning Outcomes:
- Osmosis
- Observation
Materials:
- Gummy bears
- 3 Cups of water
- 2 tablespoons of Salt
- 2 Tablespoons of Sugar
- 3 Cups/containers
Directions:
- Add 1 cup of water to each of the cups.
- Mix 2T of salt into the first cup.
- Mix 2T of sugar into the second cup.
- The third cup will just have water.
- Place one gummy bear in each cup.
- Wait between 12-72 hours.
- Check the results!
Expert Tips:
- The longer you wait, the more dramatic the changes.
- Take before and after pictures to help visualize the change.
Learn more about this activity at kiwico.com

Butter In A Jar
Learning Outcomes:
- Observation
- Separation: fat and buttermilk
- Life skills
- Process of making butter
Materials:
- 1 c Heavy Cream
- Mason Jar with Lid
- ½ tsp. Salt (optional)
- Marbles to help the shaking process (optional)
Directions:
- Pour the cream into the jar.
- (Optional) Add the salt and marbles.
- Shake, shake, shake!
- After about 10 minutes of shaking, the butterfat will separate from the buttermilk.
- Spread the butter on warm bread and share with a friend.
Expert Tips:
- Take turns shaking with other people to prevent yourself from getting tired.
- Place a marble in the jar to speed up the shaking process.
- Shake while having a dance party with music or play pass the potato!
Learn more about this activity at steamsational.com
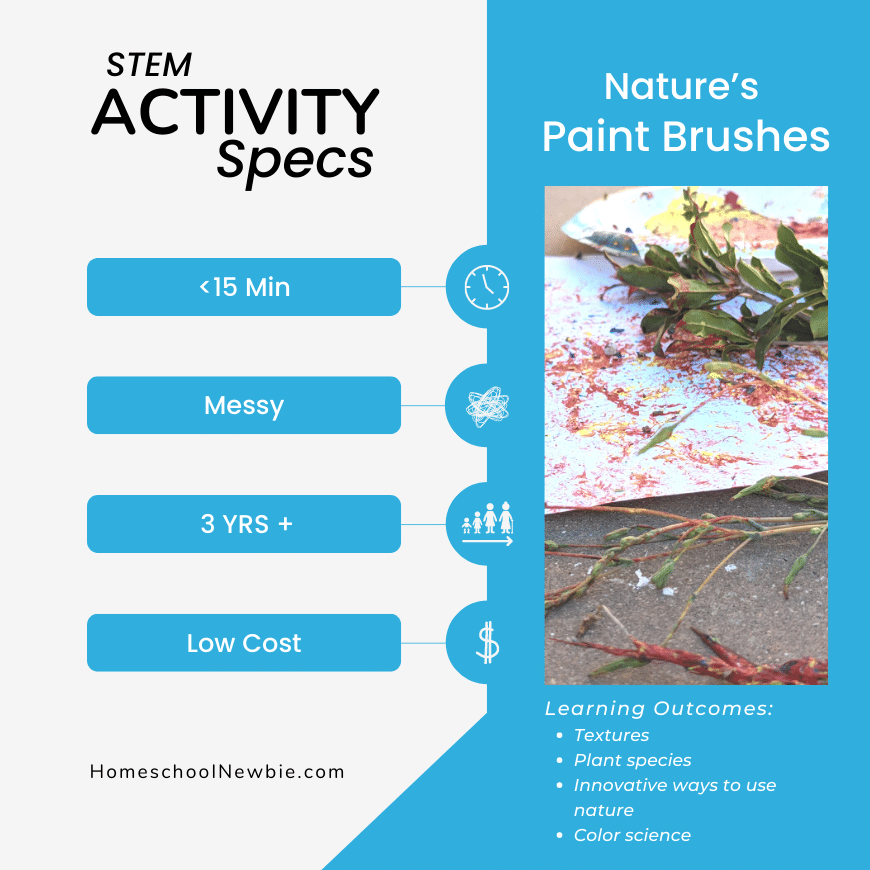
Nature’s Paintbrushes
Learning Outcomes:
- Textures
- Plant species
- Innovative ways to use nature
- Color science (mixing colors)
Materials:
- Paint
- Paper
- Rubber band, string, or twist ties
- Containers/paper plate
- Natural materials
- Small sticks
- Leaves
- Flours
- Pine needles/cones
- Rocks
- Shells
Directions:
- Gather natural materials to use as a paintbrush. (ideas above)
- Pour the paint into containers.
- Bundle the natural material into clusters using a rubber band or string.
- Dip the end of the natural “paintbrush” into the paint.
- Begin creating!
Expert Tips:
- Use rocks and flowers to “stamp” a pattern on the paper.
- Learn about the natural materials the children find and use to paint with.
Learn more about this activity at crystalbridges.org

Edible Marshmallow Slime
Learning Outcomes:
- Measurement
- Chemical reactions with heat
- Texture
Materials:
- 2 tablespoons coconut (or cooking oil of choice)
- 3 1/2 cups mini marshmallows
- 2 tablespoons cornstarch/ powdered sugar + more for kneading
- 4 Drops of food coloring (optional)
- Microwavable bowl
Directions:
- Microwave 3 ½ cups of marshmallows with 2 tablespoons of coconut oil for 20 seconds.
- Stir then continue to microwave the marshmallows in 10-second intervals until melted.
- Mix in ¼ cup of powdered sugar and 4 drops of food coloring.
- Set aside as the mixture cools and firms for 10 minutes.
- Knead the mixture using powdered sugar or cornstarch to prevent sticking.
- Once the mixture doesn’t stick to your hands, it’s time to play (and taste) your slime!
Expert Tips:
- This recipe is VERY sticky. When kneading, we used a lot of extra powdered sugar to help prevent the slime from sticking so much.
- Although this is edible, the large amount of sugar in this recipe is not healthy. This recipe is meant to be tasted and not eaten in full.
- Try creating fun, themed slime: Unicorn, gummy bear, or monster
Learn more about this activity at messylittlemonster.com

Sun Prints
Learning Outcomes:
- Sun energy
- Observation
Materials:
- Black construction paper
- Small flat items
- Toys
- Leaves
- Craft supplies
- Household items
Directions:
- Arrange small flat items on the black construction paper in a sunny location.
- Wait for 4+ hours of sunlight time.
- Remove the items to reveal the sun prints.
Expert Tips:
- The flatter the objects, the more contrast your sun prints will be.
- Try leaving the items on the paper for as long as possible for better results.
- Turn this activity into an art project.
- Use this activity to also teach about patterns.
Learn more about this activity at theresjustonemommycom
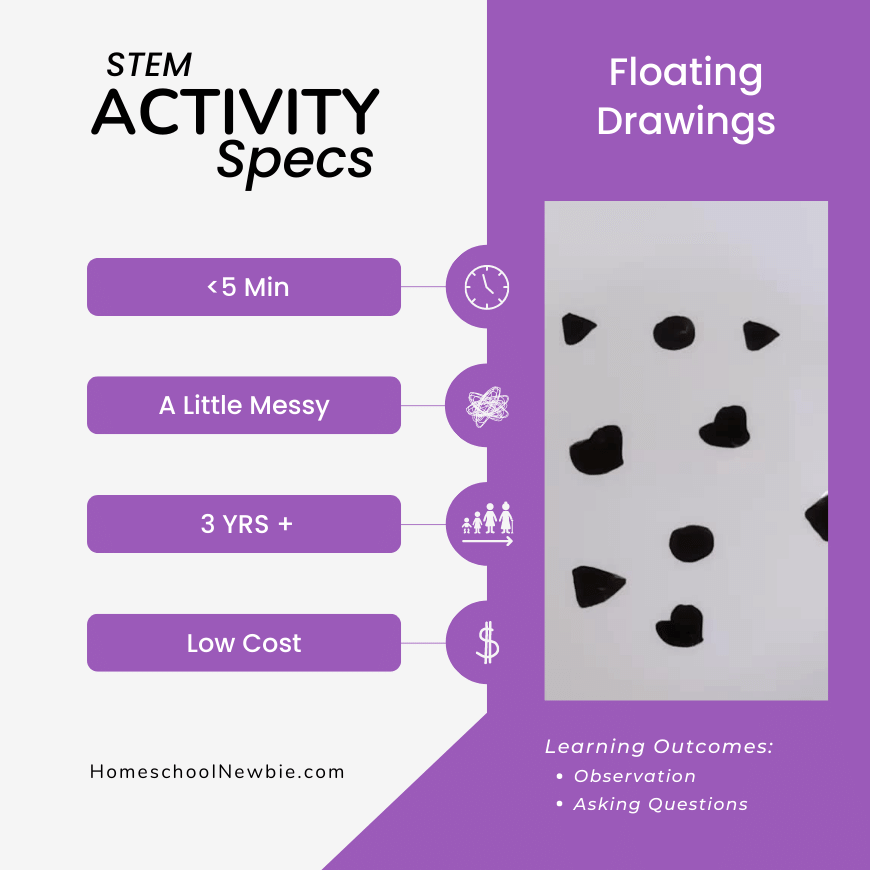
Floating Drawings
Learning Outcomes:
- Observation
Materials:
Directions:
- Draw pea-to-quarter-sized images on the plate with dry erase markers.
- Slowly pour water onto the plate.
- Wait a few seconds and watch the drawings start to peel off the plate!
Expert Tips:
- If the drawing isn’t lifting, try tilting the plate to encourage the water to get under the marker.
- Drawings that are small and connected will be less likely to break.
- New markers work best for this activity.
- How it works: the dry erase markers contain an oily silicone polymer which prevents it sticking to the plate. This makes the dry it easy for the water to lift the drawings off the plate.
Learn more about this activity at littlebinsforlittlehands.com

Make Music With Water
Learning Outcomes:
- Sound – pitch
Materials:
- Glass cups/containers
- Water
- Food coloring (optional)
- Metal spoon or pencil
Directions:
- Set tall glass cups in a row.
- Fill the cups with various amounts of water.
- Tap the metal spoon on the glasses to hear the different sounds it makes.
Expert Tips:
- Create a song with your new instrument!
- Also try the Water Whistle Experiment.
Learn more about this activity at prekinders.com

Flour Sensory Play
Learning Outcomes:
- Textures
- Observation & exploration
- 5 Senses
- Measurement & weight
- Fine motor skills
Materials:
- Flour
- Bucket
- Measuring cups & spoons
- Other kitchen utensils: whisk, spatula, ice cream scoop
- Tablecloth (optional)
Directions:
- Lay out a tablecloth or set up your station in a location you don’t mind cleaning up a mess!
- Place a bucket in the middle and it fill with flour about ¼ of the way full.
- Set out various scooping and mixing tools.
- Play, dig, explore, and make a mess!
Expert Tips:
- We also like to do this activity with rice!
Learn more about this activity at mommyandme.ae

Leaf Rub Coloring
Learning Outcomes:
- Identify plant species
- Leaf anatomy
Materials:
Directions:
- Collect leaves and place them under the paper.
- With a crayon, press down hard on the paper as you color back and forth.
- As you color, you will start to see the print of the leaves appear on the paper.
Expert Tips:
- For a more clear leaf print, turn the crayon on its side when coloring.
- Use detailed leaves for fancier leaf prints.
Learn more about this activity at firstpalette.com

Slide Painting
Learning Outcomes:
- Gravity
- Force in motion
Materials:
Directions:
- Prop up your board or slide on something elevated such as a chair.
- Set paper on top. Large paper or scratch paper taped together.
- Squeeze a few dots of paint at the beginning of the slide on the paper.
- Push toy cars through the paint and down the slide to create a masterpiece!
Expert Tips:
- We didn’t have large paper so we just taped scratch paper together. It worked just as fine!
- Race two cars down the slide.
- Have the slide point into the grass or other area that will catch the painted cars to prevent more mess.
Learn more about this activity at icanteachmychild.com

Bonus! Regrow Kitchen Scraps
Learning Outcomes:
- Plant life
- Life skills
Materials:
- Container
- Water
- Toothpicks (optional)
- Kitchen scraps that will grow (see list below)
Directions:
- Cut your food item of choice.
- Place it in water.
- Wait about 7-14 days and you’ll begin to see roots.
- Replant to grow long term.
Expert Tips:
- Change the water every day to prevent mold from growing on your plants.
- You can do this experiment with a number of kitchen veggies.
- Celery
- Potatoes/sweet potatoes
- Onions/green onions
- Cabbage/lettuce
- Avocado pit
- Herbs: cilantro, basil, mint
- Roots: Carrots, beets, ginger, garlic
Learn more about this activity at ruralsprout.com
What’s Next?
I hope you enjoyed these activities as much as my preschooler and I did. Save these 21 preschool science activities for later and download your free eBook with a super secret 7-Day Challenge inside!
Want more fun easy science activities? Check out this post with 157+ easy STEM activities!
Here’s The Activities We Covered:

Hi, I’m Courtney! I’m the founder of homeschoolnewbie.com. I’m a former elementary school teacher turned homeschool mama who has a passion for home education! I have 10+ years of experience working with children in all kinds of educational settings. As a new homeschooling parent, my mission is to navigate the world of homeschooling and share with you the best home education practices. If you want to learn more about me, check out my about page. See you there!